
Arcade Machine Delivery and Installation Checklist for Overseas Buyers
Prepare access, utilities, layout, payment systems, receiving, installation and handover before imported arcade equipment arrives.
Quick Answer: How Do You Prepare a Venue for Arcade Machine Delivery?
Confirm the unpacked and packed dimensions, package weight, delivery route, unloading method, staging area, final machine position, player and service clearances, floor and fixing requirements, electrical supply, network and payment-system readiness, local approvals, installation responsibilities, tools, staff, and receiving procedure. Keep the approved model documents and packing list available on delivery day.
Do not use a universal machine-per-area rule or clearance value. The correct space depends on the selected machine, player movement, queues, maintenance access, fixed building features, circulation, and local requirements.
1. Start Site Preparation Before the Order Is Final
The delivery route and utilities can affect which model or configuration is practical. Before approving a large twin-player machine, motion simulator, long air hockey table, tall basketball machine, or multi-package attraction, compare its dimensions with the actual route into the venue.
Send the supplier:
- destination country and delivery address when available;
- usable floor plan with verified dimensions;
- entrance, loading area, corridor, door, elevator, stair, turn, and ceiling restrictions;
- final installation area and fixed features;
- target opening and installation schedule;
- voltage, frequency, plug or connection requirement confirmed for the site;
- preferred payment system and network plan;
- venue access rules, working hours, and contractor requirements;
- unloading, moving, assembly, and installation responsibilities.
Ask for complete-machine dimensions and, when available, confirmed package dimensions and gross weight. Also ask whether seats, headers, guards, nets, tables, or decorative assemblies ship detached and what assembly is required at destination.
2. Map the Complete Delivery Route
Measure the path from the vehicle handover point to the final position. The smallest doorway is not the only constraint. A package can clear a door and still fail at a tight turn, low soffit, narrow elevator, short loading dock, ramp, or stair landing.
Record:
- truck access and unloading position;
- loading dock height or ground-level handover;
- liftgate, forklift, pallet jack, crane, or other handling requirement;
- door clear openings after handles and stops are considered;
- corridor width and turning space;
- elevator door, car, and rated capacity;
- stair dimensions and landing space if stairs cannot be avoided;
- ceiling height, overhead signs, sprinklers, lights, and cable trays;
- floor transitions, slopes, thresholds, and surface protection;
- security gates, mall access routes, and restricted delivery times.
Use the packed package dimensions for the delivery path and the complete-machine dimensions for final placement. If disassembly is proposed to solve an access problem, confirm which components may be removed, who can remove and refit them, and whether this affects testing or warranty.
Keep customers, children, and unrelated staff out of the moving area. Commercial machines can be heavy and awkward; the logistics provider should select trained personnel and appropriate handling equipment for the confirmed packages and site.
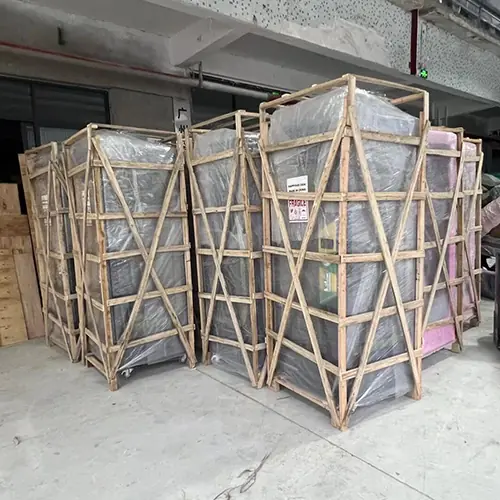
3. Prepare a Safe Receiving and Staging Area
The staging area is where the receiving team can count packages, inspect external condition, organize accessories, and prepare machines for final movement without blocking public circulation.
Choose a space that is:
- authorized by the venue or property manager;
- protected from weather and uncontrolled public access;
- large enough for the package and safe unpacking activity;
- close enough to the installation route to avoid unnecessary handling;
- supplied with suitable lighting;
- clear of fire routes, exits, and other protected access;
- coordinated with waste removal for packing materials.
Do not dispose of packing material immediately. Keep it until the package count, visible condition, accessories, and initial machine checks have been completed and any carrier reporting requirement has been satisfied.
For a mixed order, mark zones by model or package ID. This prevents keys, cords, seats, controllers, balls, pucks, nets, guards, and spare parts from being separated from their machines.
4. Confirm the Final Layout and Operating Clearance
A floor plan should show more than cabinet rectangles. It should include player positions, waiting areas, opening doors, seat movement, service access, staff sightlines, and circulation around the selected equipment.
Review:
- player entry and exit for seated or enclosed machines;
- standing and movement area for basketball, boxing, football or soccer, dance, shooting, and other active games;
- queues and spectator space around popular attractions;
- rear, side, top, or front service access required by the model;
- coin-box, cashless-reader, prize, or consumable access;
- sound and sightline relationships between nearby machines;
- access to emergency routes and building systems;
- stable, level placement and any model-specific anchoring or fixing requirement;
- staff cleaning, replenishment, and maintenance workflow.
Venue codes and accessibility, fire, electrical, structural, and safety rules vary by location. Have the layout reviewed by the relevant property team and qualified local professionals. A supplier's equipment layout can support coordination but does not replace local approval.
5. Complete Electrical Preparation Before Delivery Day
Use the final approved machine list to create an electrical schedule. Record the machine ID, position, required voltage and frequency, plug or connection method, rated information provided for the model, and the circuit or outlet assigned by the local electrician.
The electrician should verify:
- site supply and circuit capacity;
- grounding and protective devices;
- outlet or connection location;
- cable routing that does not create a trip or service hazard;
- isolation or switching required by the model or local rules;
- compatibility of the finished machine configuration with the site;
- any dedicated requirements for motion, large, or otherwise specialized equipment.
Do not select adapters or modify wiring on the assumption that physical plug fit proves electrical compatibility. Do not power several machines from an improvised temporary arrangement simply to accelerate opening. Follow the supplier's model-specific information and local electrical requirements.
6. Prepare the Payment System and Network
Payment-system installation often involves more than attaching a reader. Before the machines arrive, assign responsibility among the machine supplier, payment-system provider, venue IT team, and installer.
Confirm:
- coin, token, card, cashless, or free-play method for each model;
- reader or acceptor supply and mounting responsibility;
- required credit or start interface;
- network cabling, Wi-Fi, switches, server, kiosk, or cashier-system requirements;
- software accounts and device registration;
- game pricing and staff authorization;
- test cards, tokens, or coins available for commissioning;
- fallback and support contacts if the central system is not ready.
Machine-level factory testing can confirm an agreed interface. Final venue commissioning may still require the payment provider to configure readers, software, network, and accounts on site. Document that boundary before shipment.
7. Confirm Local Requirements and Documents
The buyer or importer should identify the local rules that apply to the selected equipment and venue. Requirements can involve import documents, electrical work, building management, fire and egress, accessibility, structural support, workplace safety, amusement operation, data or payment systems, and other destination-specific matters.
Before installation, organize:
- commercial invoice and packing list;
- bill of lading, airway bill, or relevant transport document;
- available product parameter and installation information;
- applicable certificate or test documents for the selected product, model, standard, market, and validity;
- contractor approvals and site permits where required;
- delivery booking and property-management authorization;
- local professional sign-offs required for utilities or installation.
Do not treat one certificate as universal evidence for every EPARK product. Confirm scope against the exact ordered machine and local requirement. When the requirement is unclear, use a qualified customs, compliance, electrical, structural, or safety professional in the destination market.
8. Assign Responsibilities and Installation-Day Contacts
Create a responsibility table before the shipment arrives.
| Task | Responsible party | Required confirmation |
|---|---|---|
| Customs and destination release | Buyer/importer or appointed agent | Documents and status |
| Delivery booking | Buyer/logistics provider | Date, access window, vehicle |
| Unloading and internal movement | Appointed logistics team | Equipment and staff |
| External package inspection | Receiving lead | Photos and carrier notes |
| Unpacking and waste control | Installer/venue team | Safe staging plan |
| Mechanical assembly | Qualified installer | Model instructions |
| Electrical connection | Qualified local electrician | Site and model compatibility |
| Payment-system commissioning | Payment provider/assigned team | Reader, network, account tests |
| Machine functional check | Installer and venue operator | Handover checklist |
| Staff orientation | Assigned project/support contact | Operating and support records |
List names, mobile numbers, site access credentials, and escalation contacts. The person approving delivery damage should be available while the carrier is still on site, subject to the carrier's procedure.
9. Inspect the Shipment Before Unpacking
At vehicle or warehouse handover, compare the package count and marks with the transport and packing documents. Inspect each package externally before signing according to the carrier's process.
Record:
- package ID and count;
- overall package condition;
- tears, punctures, crushing, moisture, broken framing, or unusual tilt;
- seal information where applicable;
- photographs of all sides and close-ups of visible damage;
- notes added to the carrier record;
- time, date, location, and receiving contact.
Follow the logistics provider's claim-notification requirements and deadlines. The supplier should not promise a universal claim process because responsibilities depend on the shipping contract, insurance, trade term, carrier, and destination.
If damage may make movement or unpacking unsafe, stop and ask the responsible logistics or safety contact for direction.
10. Unpack, Count, and Match Accessories
Move packages to the approved staging area and follow the supplied unpacking instructions. Use tools that will not damage cabinet surfaces, cables, screens, artwork, or hidden components.
For each item:
- photograph the package identifier;
- document the condition as protective layers are removed;
- compare the machine with the order and factory evidence;
- locate its keys, cords, detachable assemblies, accessories, and spare parts;
- record visible damage, loose components, or missing items before assembly;
- retain labels and relevant packing until the check is complete.
Do not mix accessories from different models. If a carton contains parts for several machines, create a receiving list and assign each component before installation begins.
11. Assemble and Position the Machine
Follow the model-specific instructions for seats, headers, guards, nets, controllers, tables, decorative elements, or other detached components. Use the specified fasteners and connection points; do not substitute hardware without approval.
Before final placement:
- inspect accessible connectors and cables for transport movement;
- confirm no packing material remains in fans, mechanisms, returns, or service areas;
- level and stabilize the machine as specified;
- lock or secure detachable elements;
- maintain the planned player and service clearances;
- route power and network cables safely;
- apply any approved fixing or restraint method required by the model and local site.
Heavy, motion, tall, or physically interactive equipment may need specialized installers and site review. Follow the actual model documentation rather than assuming that a general arcade technician can perform every task.
12. Complete a Controlled First Power-On
The first power-on should happen after the electrical configuration and site supply have been checked. Keep the machine accessible for observation and do not place every unit into public service immediately.
Check:
- correct machine and circuit identification;
- secure power connection and normal startup;
- error messages, unusual sound, smell, heat, or movement;
- screen, sound, lighting, controls, and each player station;
- model-specific mechanical functions;
- coin, card, cashless, or free-play start behavior;
- settings and language approved for the venue;
- linked operation when included;
- safe shutdown and restart according to the instructions.
If an issue appears, record the machine ID, symptoms, sequence, photographs or video, and any error information. Do not repeatedly modify wiring, settings, or components before contacting the appropriate support party; uncontrolled changes make remote diagnosis harder.
13. Commission the Venue, Not Only Individual Machines
Once individual machines work, test the operating system around them.
Walk through a realistic customer and staff sequence:
- customer obtains coins, tokens, or a card;
- payment adds the expected credit;
- machine starts and completes a game;
- scoring, prizes, or redemption functions work only where applicable;
- staff can access the required service area;
- settings, volume, and lighting are appropriate for adjacent zones;
- queues do not block circulation or other machines;
- cleaning and replenishment can be performed safely;
- the payment or management system records the expected event when that function is included.
Test at least one complete journey for every distinct machine and payment configuration. A successful test on one coin-operated machine does not validate a card reader or a different control system elsewhere in the venue.
14. Create the Handover Record
The installation is complete when the venue can identify, operate, and support the equipment—not merely when the machines are standing in position.
Keep a handover file with:
- final machine list and positions;
- model and package identifiers;
- approved specifications;
- electrical schedule;
- payment-system configuration notes;
- keys and access mapping;
- accessory and spare-parts inventory;
- operating and installation information;
- factory inspection and receiving evidence;
- open issue log and action owners;
- warranty terms and support contacts;
- staff orientation record where applicable.
EPARK has confirmed a two-year warranty, offline, online, and remote after-sales support, and spare-parts coordination. Use the written terms for the actual order and do not infer unconfirmed response times, free replacement, lifetime service, or global on-site coverage.
Common Delivery and Installation Mistakes
Avoid these recurring planning failures:
- checking only the final doorway and ignoring turns, elevators, or the packed package;
- selecting equipment before confirming electrical and payment-system requirements;
- treating the supplier's layout as local regulatory approval;
- scheduling the carrier, electrician, payment provider, and installer on different assumptions;
- allowing accessories from a mixed order to be separated or discarded;
- signing for packages without documenting visible condition;
- powering machines before site supply and configuration are verified;
- commissioning only the game function and not the complete payment-to-play workflow;
- opening to the public before active-game clearances, stability, and staff procedures are checked;
- reporting a problem without the machine ID, sequence, and visual evidence.
Frequently Asked Questions
What measurements are needed before ordering an arcade machine?+
Confirm the usable installation area and the full delivery route, including unloading point, doors, corridors, turns, elevators, stairs, ceiling restrictions, and floor transitions. Compare both package and complete-machine dimensions, then add model-specific player and service space.
Who should install commercial arcade machines?+
It depends on the equipment and local requirements. The team may include trained movers, a qualified local electrician, a mechanical installer, the payment-system provider, venue IT, and the operator. Specialized or motion equipment may require additional expertise.
Can arcade machines be connected immediately after delivery?+
Only after external and unpacked condition checks, assembly, electrical compatibility verification, safe positioning, and model-specific preparation are complete. Follow the supplied instructions and local professional requirements.
What should I do if a package arrives damaged?+
Photograph the package before unpacking, record the damage through the carrier's required process, preserve relevant packing, and notify the responsible logistics, insurance, and supplier contacts according to the shipping agreement. Do not assume one universal claims process.
Does EPARK provide installation support?+
EPARK has confirmed offline, online, and remote after-sales support. The exact installation information, remote support, and any other service scope should be confirmed for the selected order. Global on-site installation should not be assumed unless agreed in writing.
What should I send EPARK for venue planning?+
Send the destination country, usable floor plan, entrances, columns, fixed services, ceiling information where relevant, target visitors, preferred machine categories, payment method, budget range, access constraints, and target opening date.
Conclusion
Successful arcade machine installation begins before the shipment leaves the factory. The buyer needs a verified route, ready utilities, a model-specific layout, assigned responsibilities, a receiving record, and a controlled commissioning process.
The goal is not to create more paperwork. It is to ensure that the product specification, shipping plan, venue, and operating system describe the same real project. When those elements are aligned, delivery day becomes a managed handover instead of an improvised problem-solving session.